 EveryGen AI
GPT-Image-2 in Practice: Design a Character Reference Sheet from One Prompt (Turnaround / Expressions / Style Directions)
Build an anime character reference sheet and check poses, expressions, accessories, and consistent anatomical placement.
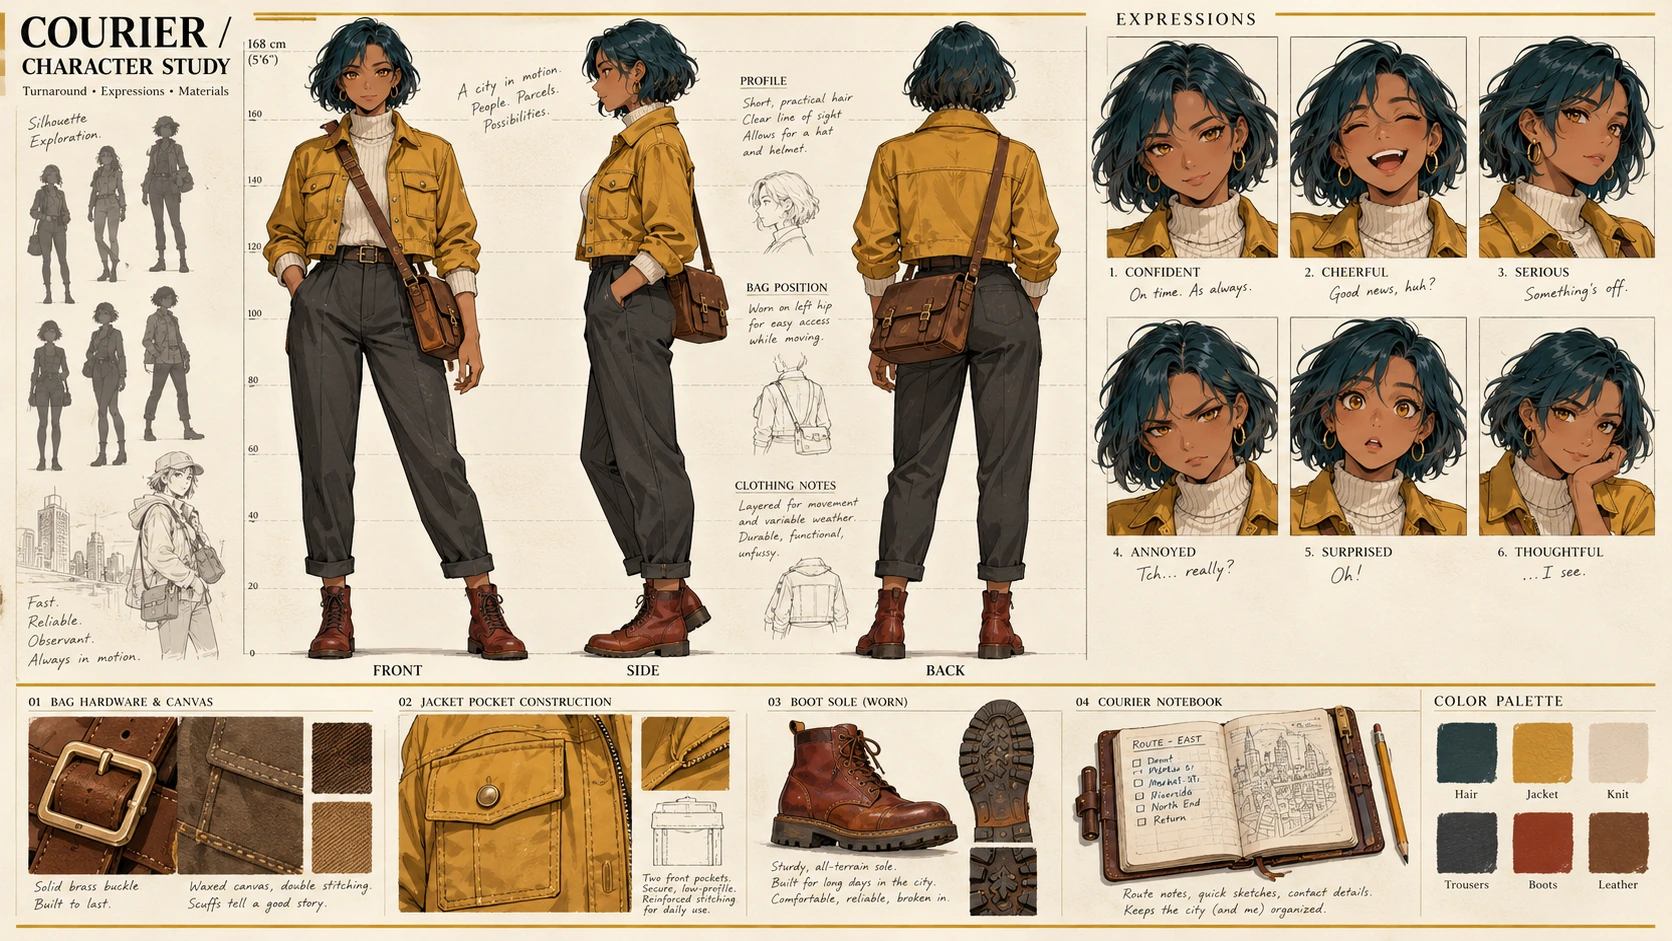
A character reference sheet should help someone draw the same character from different angles. An attractive front view is not enough if the back view moves an accessory to the wrong side or the expressions change the face.
This walkthrough defines an original adult female courier, places her in three full-body views and three expressions, and shows how to inspect the result. The main check is her crossbody bag: it belongs on her anatomical left hip, which appears on different sides of a front and back drawing.
The two images below are Codex-generated teaching illustrations. They demonstrate an error and a correction target; they are not EveryGen AI test outputs.
1. Define the character before arranging the sheet
Keep a short written specification alongside the image. It gives you a stable reference when deciding whether a variation is an intentional design choice or an error.
For this courier, use the following specification:
| Part | Design to preserve |
|---|---|
| Character | One original adult female courier |
| Hair | Short, dark-teal bob |
| Eyes | Amber |
| Skin | Warm brown |
| Jacket | Mustard-yellow cropped jacket with two front pockets |
| Underlayer | Cream turtleneck |
| Trousers | Charcoal gray |
| Footwear | Rust-red ankle boots |
| Bag | One brown rectangular crossbody bag at her anatomical left hip |
| Strap | Worn over her anatomical right shoulder, connecting to the bag at her left hip |
Use a neutral standing pose for the full-body views so the clothes and bag remain easy to inspect. Reserve the changes in mood for the expression row.
CLIP STUDIO’s official character-design lesson recommends documenting a character’s main traits and exploring poses and expressions. For this sheet, that means showing personality through the face without redesigning the hair, clothing, or accessories each time.
The page will contain exactly six drawings:
Top row: FRONT, SIDE, BACK—three full-body views.
Bottom row: NEUTRAL, HAPPY, CONCERNED—three head portraits of the same character.
Keep additional costumes, props, and expression variations out of this first sheet.
2. Resolve left and right before writing the prompt
Anatomical left means the character’s own left, regardless of where the viewer stands.
When she faces you, her left hip appears on your right. When you see her from behind, her left hip appears on your left. The bag stays on the same body side; its position within the drawing changes.
Use this translation when inspecting each panel:
| View | Correct bag placement | Strap check |
|---|---|---|
| FRONT | Viewer’s right, at the character’s left hip | From the viewer’s left shoulder toward the bag on the viewer’s right |
| SIDE, facing left | On the character’s visible left hip | Follows the body from the opposite shoulder; it should not become a second bag or switch hips |
| BACK | Viewer’s left, at the character’s left hip | From the viewer’s right shoulder toward the bag on the viewer’s left |
“Viewer’s left” and “viewer’s right” refer to positions within each drawing, not across the whole page.
Do not solve this by telling the generator to put the bag “on the left in every view.” That instruction confuses the character’s body with the picture’s coordinates.
For this sheet, the side drawing is a left-facing profile showing her left side. Her nose points toward the left edge of that panel.
3. Generate a candidate from a complete specification
Open EveryGen AI to build an original anime character sheet. Use the 3:4 portrait layout and 1K starting preset, then enter the complete prompt below.
These are starting specifications, not a promise that every drawing, label, or accessory will be correct. Save the downloaded candidate and the prompt used so you can compare revisions against a known version.
Create one 3:4 portrait anime character reference sheet for a single original adult female courier.

Show the same character throughout the sheet. Use clear anime linework, restrained shading, a plain light background, and enough space between drawings to inspect the design.

Character specification:
- Adult woman with consistent adult body proportions.
- Warm brown skin.
- Amber eyes.
- Short dark-teal bob haircut, with the same length and silhouette in every view.
- Mustard-yellow cropped jacket with exactly two front pockets.
- Cream turtleneck underneath.
- Charcoal-gray trousers.
- Rust-red ankle boots.
- One brown rectangular crossbody bag.
- The bag is always worn at her anatomical LEFT hip.
- Its strap is worn over her anatomical RIGHT shoulder and connects to the bag at her left hip.

Layout:
Use two rows.

TOP ROW:
Exactly three full-body drawings, arranged left to right and labeled:
FRONT
SIDE
BACK

Keep the figures at the same scale, in a relaxed neutral standing pose, with aligned head heights and a shared ground level. Show the entire head and both feet. Keep the arms positioned so the clothing and bag can be inspected.

FRONT:
Face the viewer directly.
The bag at her anatomical left hip appears on the VIEWER'S RIGHT.
The strap runs from the VIEWER'S LEFT shoulder toward the bag on the VIEWER'S RIGHT.

SIDE:
Show a strict left-facing profile, with her nose pointing toward the left edge of the panel.
Show her left side, with the bag on the visible left hip.
Keep the bag's placement and construction consistent with the front and back views.
Do not substitute a three-quarter view.

BACK:
Show her directly from behind, including the back of her hair and clothing.
The bag at her anatomical left hip appears on the VIEWER'S LEFT.
The strap runs from the VIEWER'S RIGHT shoulder toward the bag on the VIEWER'S LEFT.
Do not place the bag on the viewer's right in this view.

The viewer-left and viewer-right instructions apply within each individual view, not across the entire page.
Rotate the character between views; do not simply mirror a drawing.

BOTTOM ROW:
Exactly three head portraits at matching scale, arranged left to right and labeled:
NEUTRAL
HAPPY
CONCERNED

NEUTRAL: relaxed eyebrows and a resting mouth.
HAPPY: a warm smile and relaxed, lifted expression.
CONCERNED: slightly knitted brows and a worried mouth.

Preserve the same face shape, bob haircut, skin tone, and amber eye color across the portraits. Change the expression, not the character's identity.

Keep clothing colors, garment lengths, pocket construction, boot shape, bag shape, and strap attachment consistent wherever visible.
Allow normal occlusion: do not show front jacket pockets through the back of the jacket.

Render each of the six labels exactly once, clearly separated from the artwork.
Do not add a fourth expression, extra views, extra bags, alternate outfits, logos, speech bubbles, or background scenes.
4. Inspect six drawings—not one attractive page
Begin with the inventory: three full-body views, three expression portraits, and the six correct labels. Check that the figures are fully visible and the side view is actually a profile.
Then compare the design across panels.
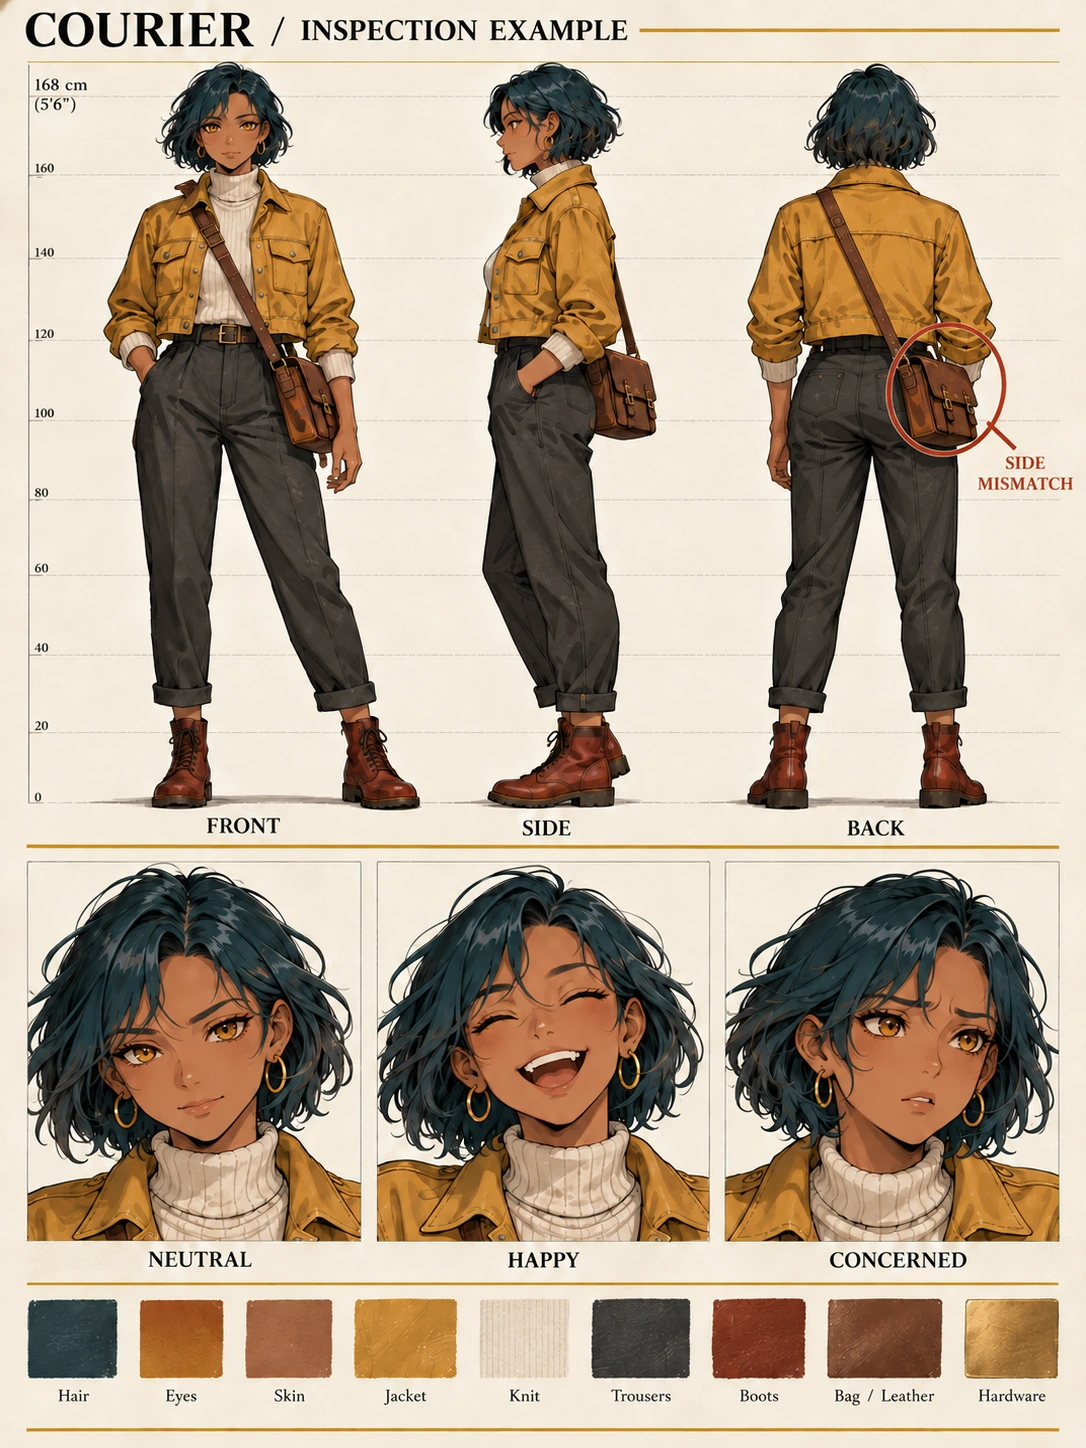
Codex-generated error-identification illustration, not a EveryGen AI test output. The front-view bag placement is correct; the back-view bag is on the wrong side.
Follow the bag and strap
In this teaching candidate, the front view places the bag on the viewer’s right. That agrees with the character’s anatomical left hip.
The back view also places the bag on the viewer’s right. That is the error: from behind, it should appear on the viewer’s left.
Trace the strap as well as checking the bag. A correctly positioned bag with an incorrectly routed strap still leaves the design unclear. Follow the accessory from shoulder to hip, checking that there is one bag and one coherent strap arrangement in each view.
Compare body landmarks
Look across the full-body row at the top of the head, shoulders, jacket hem, hips, knees, and boot soles. Differences should come from the viewing angle, not from a new body shape or a different garment length.
GraceGit’s turnaround tutorial on CLIP STUDIO TIPS uses guide marks to carry features between front, side, and back drawings. You can use the same comparison method here by placing temporary horizontal guides over a copy of your sheet in an external editor.
Do not mistake matching head and foot positions for complete consistency. Also compare the torso length, leg proportions, and jacket cut.
Check clothing where it should be visible
The jacket has two front pockets. They should not reappear as identical pockets on the back merely because the generator repeated the front design.
Compare the turtleneck height, jacket hem, trouser shape, boot height, and bag proportions. Check that colors remain recognizable across the sheet rather than changing to different materials or hues.
Check expressions without accepting a new face
The bottom row contains only NEUTRAL, HAPPY, and CONCERNED.
Compare the face shape, bob silhouette, skin tone, and eye color. The eyebrows and mouth should communicate the change in mood without turning the happy or concerned portrait into a different character.
If one portrait looks convincing on its own but no longer matches the other two, it needs review.
5. Revise one defined error
Save the original candidate before editing. When you have identified a specific mismatch, use it to revise a character reference image rather than describing the whole character again without a visual reference.
For the bag-side error, treat the bag and its connected strap as one accessory correction. Moving the bag without correcting the strap would leave the problem only partly resolved.
Use a focused request such as:
Edit the uploaded courier character sheet.

Correct the crossbody bag placement and connected strap in the BACK view only.

The bag belongs at the character's anatomical LEFT hip.
Because this is the back view, place the brown rectangular bag on the VIEWER'S LEFT within the BACK panel.
Route the strap from the VIEWER'S RIGHT shoulder down toward that bag.

Remove the incorrectly placed bag on the viewer's right and the incorrect strap path.
Restore the clothing where those incorrect elements were removed.
Keep only one bag in the BACK view.

Preserve the FRONT view, the left-facing SIDE view, and all three expression portraits.
Preserve the character's hair, face, skin tone, clothing, proportions, colors, and the six labels.
Keep the original 3:4 page layout.

Do not mirror the whole sheet or flip the entire BACK drawing.
Do not add accessories or redesign the outfit.
This describes the desired scope; it does not lock the other panels or guarantee that they remain unchanged. After the revision, inspect the entire page again—not just the corrected hip.
The next teaching image shows the intended accessory arrangement.
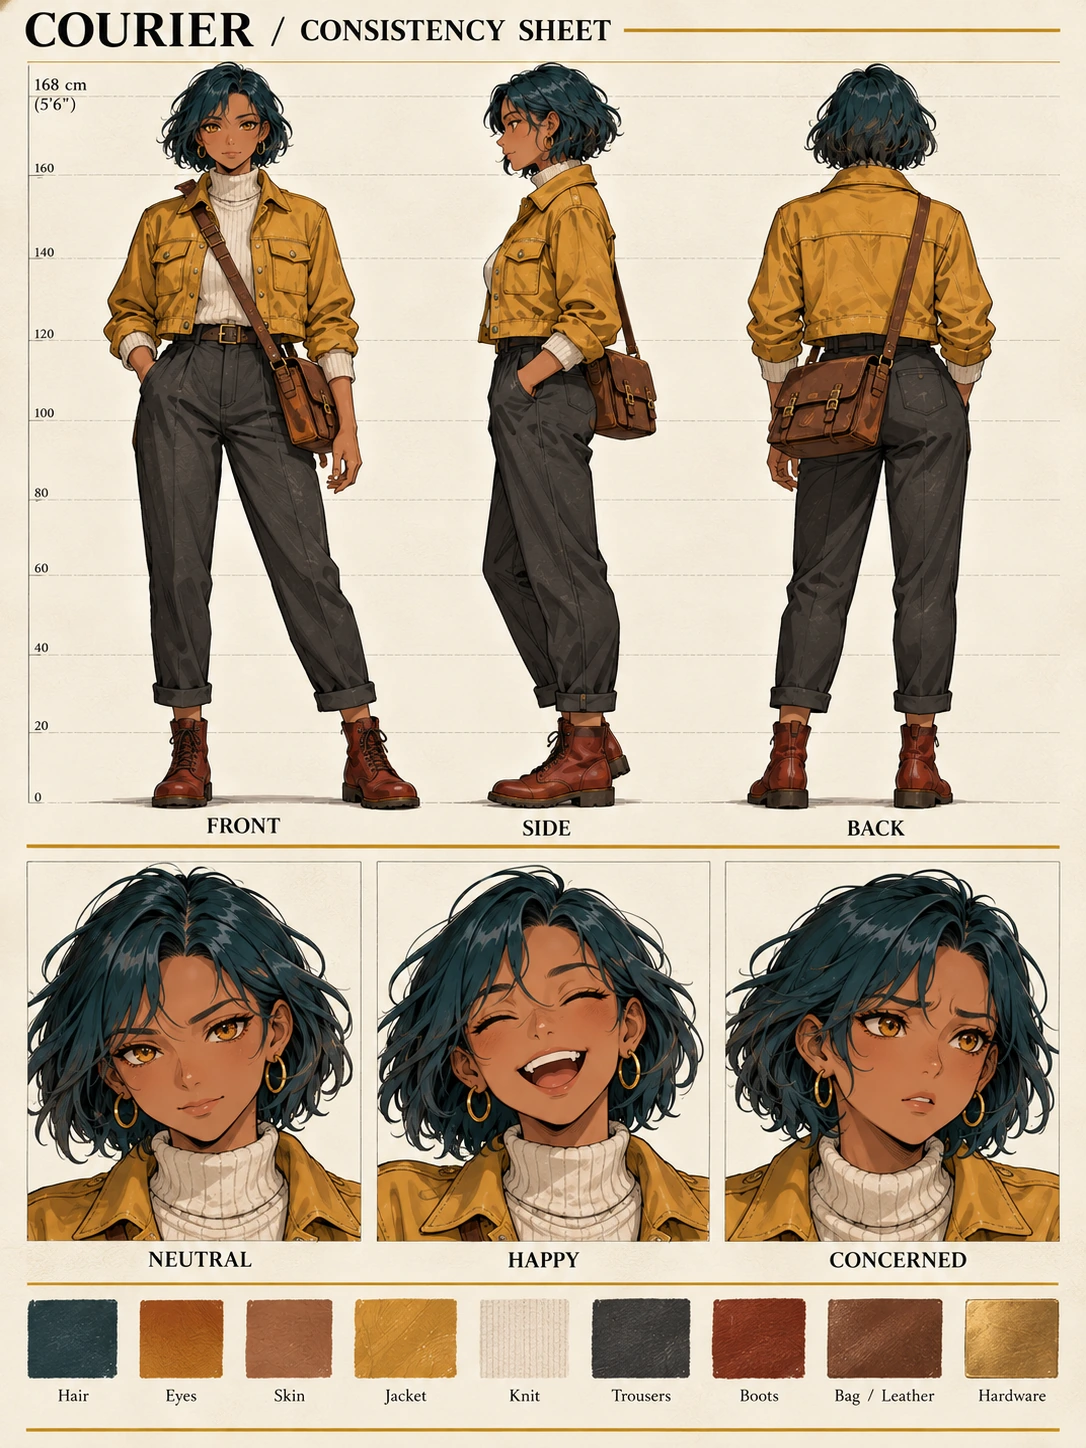
Codex-generated correction-target illustration, not a EveryGen AI test output. In BACK, the bag is on the viewer’s left and the strap runs from the viewer’s right shoulder toward it.
The front and back views now express the same rule: right shoulder to left hip, using the character’s own anatomy. The image illustrates that target; it is not evidence that the revision request will produce this exact result.
Choose a fallback that matches the remaining problem
| Problem | Next action |
|---|---|
| The side view is still three-quarter rather than profile. | Request a correction to SIDE, explicitly specifying a left-facing 90-degree profile. Recheck the bag and proportions afterward. |
| The bag moves correctly, but the strap is duplicated or disconnected. | Revise the accessory construction as one issue, removing the obsolete strap and retaining one coherent path. |
| The face or outfit changes during the bag correction. | Return to the saved candidate. Do not adopt the new face or clothes simply because the bag improved. Use an external editor when preserving the accepted panels precisely is essential. |
| A view or expression is missing, or labels overlap the drawings. | Work on the missing drawing separately from an approved reference, then assemble the page and add labels in an external editor. Check consistency before accepting the replacement. |
| Small details are unclear. | Inspect the actual downloaded pixels. Use a separate detail drawing when necessary, and label it as an additional reference rather than assuming enlargement resolves the ambiguity. |
Avoid flipping the whole back drawing as a shortcut. That changes every asymmetric feature in that panel, not just the bag.
6. Reuse an approved reference with its written rules
Once a version passes your checks, save it as the approved reference and keep earlier candidates separate. Do not leave the known bag-side error mixed into a folder of equally “final” images.
For later poses or scenes, provide the approved sheet again and repeat the essential design constraints. A compact reference note might read:
Original adult female courier. Preserve the short dark-teal bob, amber eyes, warm brown skin, mustard cropped jacket with two front pockets, cream turtleneck, charcoal trousers, and rust-red ankle boots. The single brown rectangular crossbody bag is worn at her anatomical left hip, with its strap over her anatomical right shoulder.
Add the new task separately—for example, a walking pose or a close-up. Keep the design rules distinct from the changes requested for that image.
Reusing a reference makes the intended design explicit; it is not proof of automatic character consistency. Inspect every new result, especially when the pose turns the character around or hides part of the bag.
When a new view reveals an area the sheet does not define, decide and document that detail rather than treating the generated interpretation as an already approved fact.
7. Prepare a clear handoff
Keep the full-size approved file. When you need a smaller copy, you can size a character sheet for sharing while preserving its 3:4 proportions.
Reopen the resized file and check that all six labels remain readable, no heads or boots are cropped, and the bag and strap are still clear at the size the recipient will see. Do not stretch the sheet to fit a differently shaped presentation area.
Deliver the image with the written character specification and the anatomical-left bag rule. Include any unresolved details as explicit notes rather than leaving the recipient to infer them from conflicting drawings.
Before calling the sheet ready, confirm that:
- All three full-body views and all three expressions are present and correctly labeled.
- The character’s proportions, face, hair, clothing, and colors agree across the drawings.
- The bag remains at her anatomical left hip, with the shoulder-to-hip strap route correct in each view.
- The shared file is legible, complete, and clearly identified as the approved version.
This delivers a checked visual reference—not a rigged model, an editable layered drawing, or a guarantee of consistency in future images. Its value is that the design decisions are clear enough for someone else to follow, and the remaining uncertainties are not hidden behind a polished page.