 EveryGen AI
GPT-Image-2 in Practice: Generate a Pro Storyboard from One Prompt (9-Panel Template Included)
Plan a nine-panel storyboard and check character appearance, props, scene order, and visual continuity.
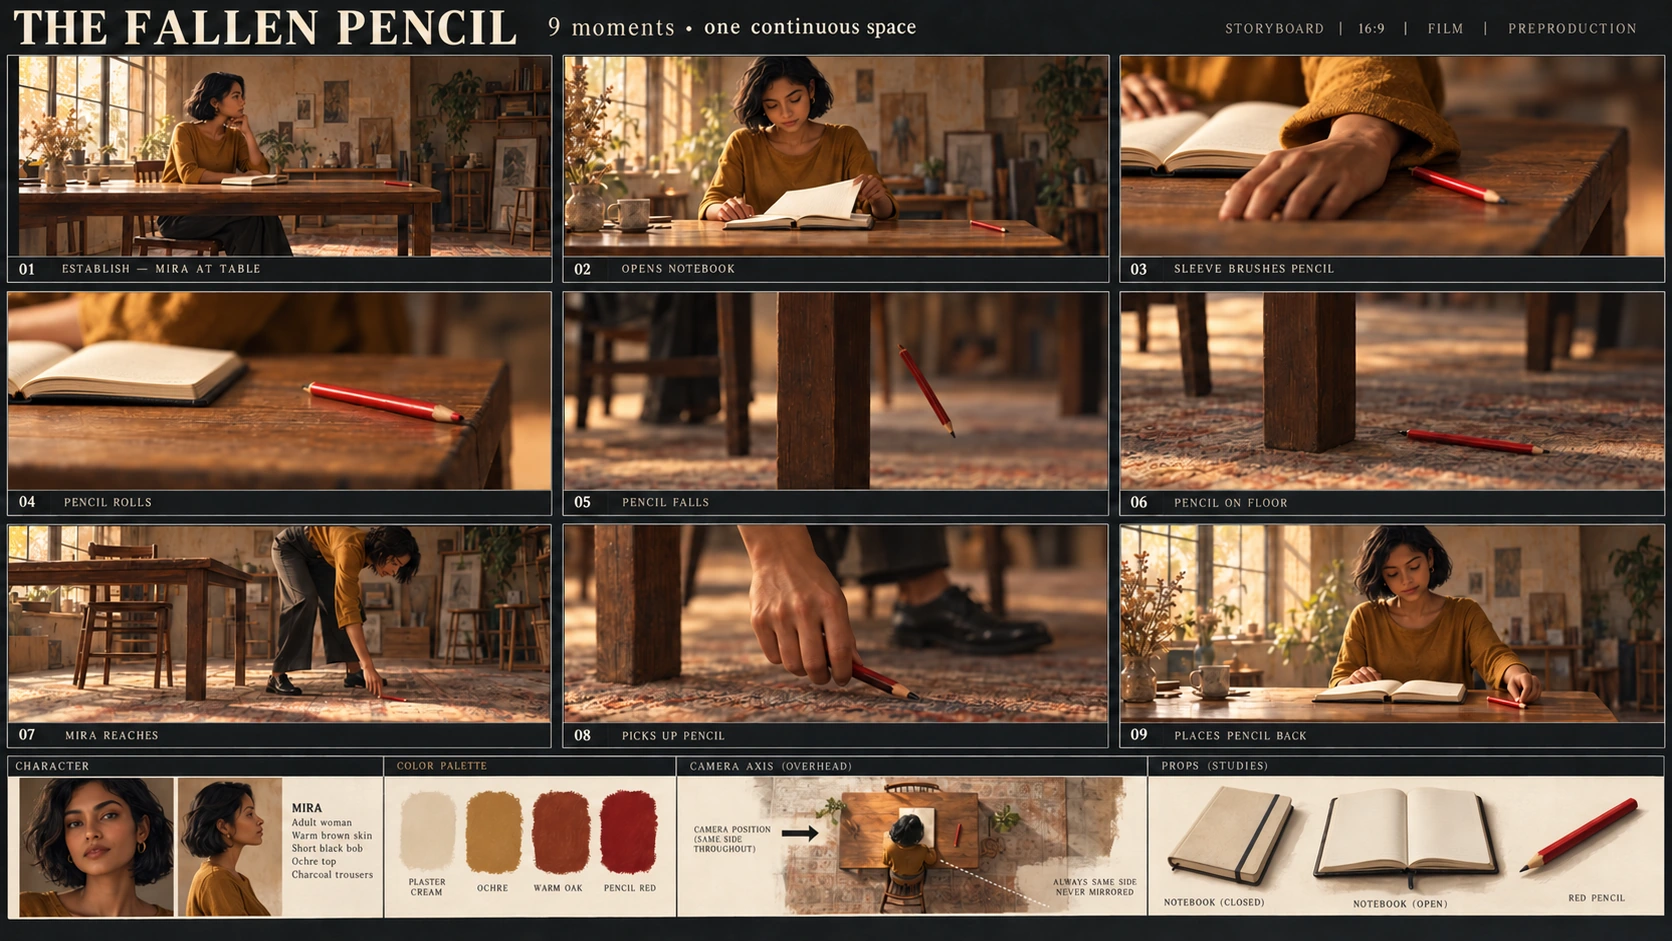
A storyboard can show the same character in every panel and still tell the wrong story. A sleeve accidentally brushing a pencil is different from a finger deliberately pushing it. A pencil that falls beside a table leg should not reappear beneath the middle of the table.
This walkthrough plans a small event: Mira opens her notebook, accidentally knocks a pencil off the table, retrieves it, and puts it back. The deliverable is one nine-panel image plus a written action plan—not a video.
The illustrations are Codex-generated teaching materials, not EveryGen AI test outputs. They show a scene reference, an observed contact error in a teaching candidate, and a focused revision.
1. Define the character, setting, and reference image’s role
Keep the scene simple enough to check.
Mira is an original adult woman with warm brown skin, a short black bob, an ochre long-sleeved top, and charcoal trousers. She sits on the viewer’s left, facing right toward a wooden table. The scene contains one wooden chair, one cream notebook, and one red pencil.
At the beginning, the notebook is closed and the pencil rests near the table’s right edge.
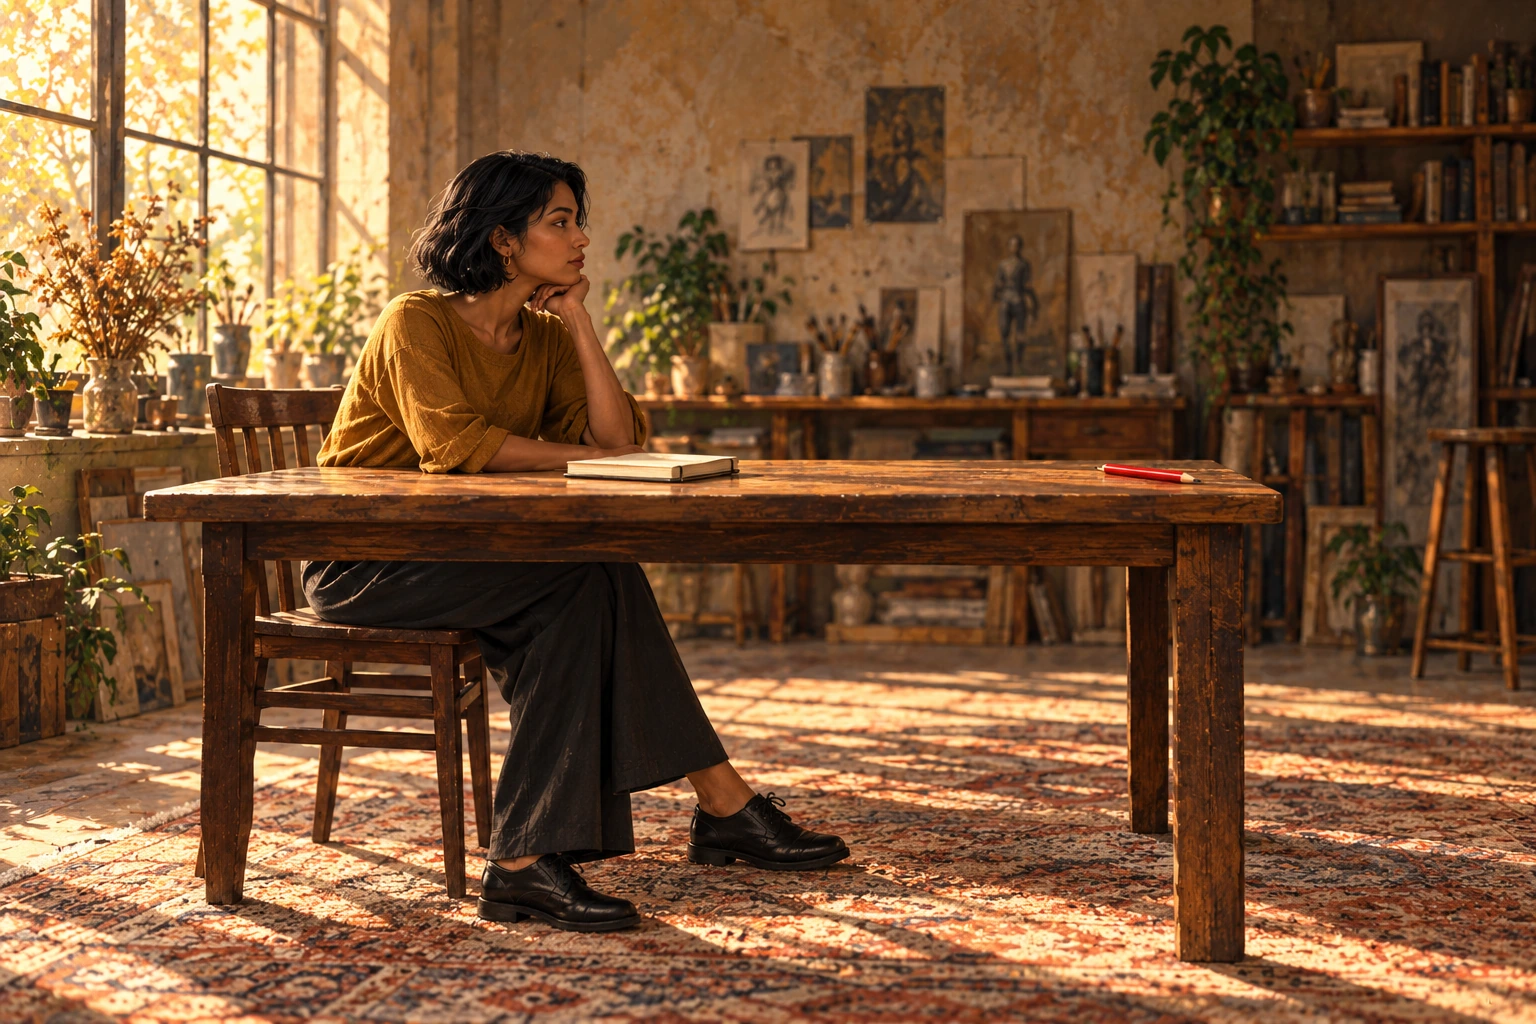
Codex-generated teaching reference for Mira’s appearance and the starting layout. It is not a EveryGen AI output.
The reference establishes the starting arrangement, not the entire sequence. It cannot explain on its own when the notebook opens, what knocks the pencil, or where Mira must move to retrieve it. Those decisions belong in the action plan.
The main workflow below starts in Text to Image. Looking at this reference does not automatically attach it to a request, so the prompt must describe the character and room. In a later Image to Image revision, the file you actually upload becomes the visual reference.
2. Write nine action states before generating nine pictures
Read the sheet left to right, then top to bottom:
01–03 across the first row, 04–06 across the second, and 07–09 across the third.
StudioBinder explains how to organize the action in a shot list by recording what happens alongside framing and camera details. For this exercise, add a separate check for the pencil’s location and the notebook’s state.
| Panel | Action and suggested framing | Required state |
|---|---|---|
| 01 | Wide view: Mira sits at the table, ready to begin. | Notebook closed; one red pencil near the right table edge. |
| 02 | Medium view: she opens the notebook. | Notebook open; pencil remains on the tabletop. |
| 03 | Close-up: her sleeve cuff brushes the pencil while she adjusts the pages. | The sleeve makes contact. Her fingers are not pushing the pencil. |
| 04 | Close-up: the pencil rolls toward the right edge. | Pencil still on the tabletop, approaching the edge. |
| 05 | Detail: the pencil falls. | Pencil in midair to the viewer’s right of the visible right-hand table leg. |
| 06 | Low detail: the pencil has landed. | Pencil on the floor immediately to the right of that leg. |
| 07 | Medium view: Mira has left her chair and moved to the table’s right end. She bends and reaches down with an empty hand. | Pencil remains at the landing spot; she has not picked it up yet. |
| 08 | Hand detail: she lifts the pencil. | One pencil in her hand; no duplicate left on the floor. |
| 09 | Medium view: Mira returns to her seat and places the pencil beside the notebook. | Notebook still open; one pencil on the tabletop; none on the floor. |
Use the visible right-hand table leg as the landmark connecting Panels 05–08. “Right” refers to the view within each panel, with the camera kept on the same side of the action—not to the panel’s position on the whole sheet.
These are nine illustrated moments, not necessarily nine separate shots. Several could later belong to one continuous shot. Do not decide that every panel needs a cut just because it has a number.
3. Set up the whole sheet in EveryGen AI
Open EveryGen AI to plan a nine-panel visual sequence.
The interface checked for this walkthrough uses Text to Image, GPT Image 2, Auto aspect ratio, 1K, JPEG, and x1. Change Auto to 3:2 explicitly.
| Setting | Choice for this example |
|---|---|
| Mode | Text to Image |
| Model | GPT Image 2 |
| Aspect ratio | 3:2 landscape, selected instead of Auto |
| Resolution preset | 1K |
| Output format | JPEG |
| Output count | x1 |
The 3:2 setting describes the entire contact sheet. The resolution preset also applies to the whole output, not independently to each of its nine panels. Space used by borders, gutters, and labels further reduces the area available for each illustration.
The teaching images are separate editorial assets. Their dimensions and format do not establish the dimensions or export options of EveryGen AI’s 1K output.
Copy the complete storyboard prompt
Create one static 3:2 landscape storyboard contact sheet containing exactly nine panels.

Layout:
Use three equal columns and three equal rows, with clear gutters separating the panels.
Read left to right, then top to bottom.
Label the panels exactly once each:
01, 02, 03 in the top row.
04, 05, 06 in the middle row.
07, 08, 09 in the bottom row.

Place each number clearly inside its own panel without covering the action.
Do not add a title, dialogue, captions, or other text.

Character:
Mira is one original adult woman with warm brown skin, a short black bob, an ochre long-sleeved top, and charcoal trousers.
Keep her appearance and clothing consistent wherever visible.

Setting:
A simple wooden table and one wooden chair.
Mira begins seated on the viewer's left, facing right toward the table.
There is one cream notebook and exactly one red pencil.
The notebook starts closed.
The pencil starts near the right edge of the tabletop.

Maintain the same basic room orientation throughout.
Closer framing and lower viewing angles are allowed, but do not mirror the scene.
Use the visible right-hand table leg as the landmark for the pencil's fall and landing.
Viewer-left and viewer-right refer to positions inside each panel.

Panel 01:
Wide view. Mira sits at the table.
The cream notebook is closed.
One red pencil rests near the right edge of the tabletop.

Panel 02:
Medium view. Mira opens the notebook.
The pencil remains on the tabletop near the right edge.

Panel 03:
Close-up of the accidental contact.
As Mira adjusts the open notebook's pages, the cuff of her ochre sleeve brushes the red pencil.
Show the sleeve touching the pencil.
Her fingers must not push, point against, or deliberately flick the pencil.

Panel 04:
Close-up. The red pencil rolls toward the right edge.
It is still on the tabletop.
Show one pencil, not several ghosted positions.

Panel 05:
Detail view. The pencil has left the tabletop and is falling through the air.
Place it to the viewer's right of the visible right-hand table leg.
There is no pencil remaining on the tabletop.

Panel 06:
Low detail. The red pencil lies on the floor immediately to the viewer's right of the same table leg.
Keep the landing location consistent with Panel 05.

Panel 07:
Medium view. Mira has left the chair and moved to the right end of the table.
She bends toward the landing spot and extends an empty hand toward the pencil.
The pencil is still on the floor to the right of the right-hand table leg.
Do not leave Mira seated on the left.
Do not move the pencil beneath the center of the table.

Panel 08:
Close-up. Mira's hand holds the one red pencil above the landing spot.
The floor below is empty.
Do not leave a second pencil on the ground.

Panel 09:
Medium view. Mira is seated on the left again, facing the table.
The cream notebook remains open.
She has placed the one red pencil on the tabletop beside it.
There is no pencil on the floor.

Visual treatment:
Use clear storyboard illustrations with restrained color and readable actions.
Keep the red pencil easy to identify.
Use a richly textured, warmly lit atelier background with consistent furniture construction. Keep decorative background details subordinate to the action.
Frame close-ups to show the relevant contact or location; Mira's face does not need to appear in every panel.

Continuity rules:
The notebook remains open from Panel 02 onward.
There is only one physical pencil in each depicted moment.
Do not duplicate the pencil to suggest movement.
Keep the chair on the original side of the table.
Do not add another person, duplicate pencils, or extra notebooks. Background studio props may remain, but must not obscure or change the action.
Paste the prompt, confirm the settings, and submit when ready. Save the downloaded candidate with its prompt and settings.
The prompt is a specification to review, not a guarantee that the model will preserve every object, position, or action.
4. Read the candidate as a sequence, not a collection
First count nine panels and check the labels. Then read the action without relying on the written table to explain away unclear pictures.
The following teaching candidate has a useful contact error to inspect in Panel 03.
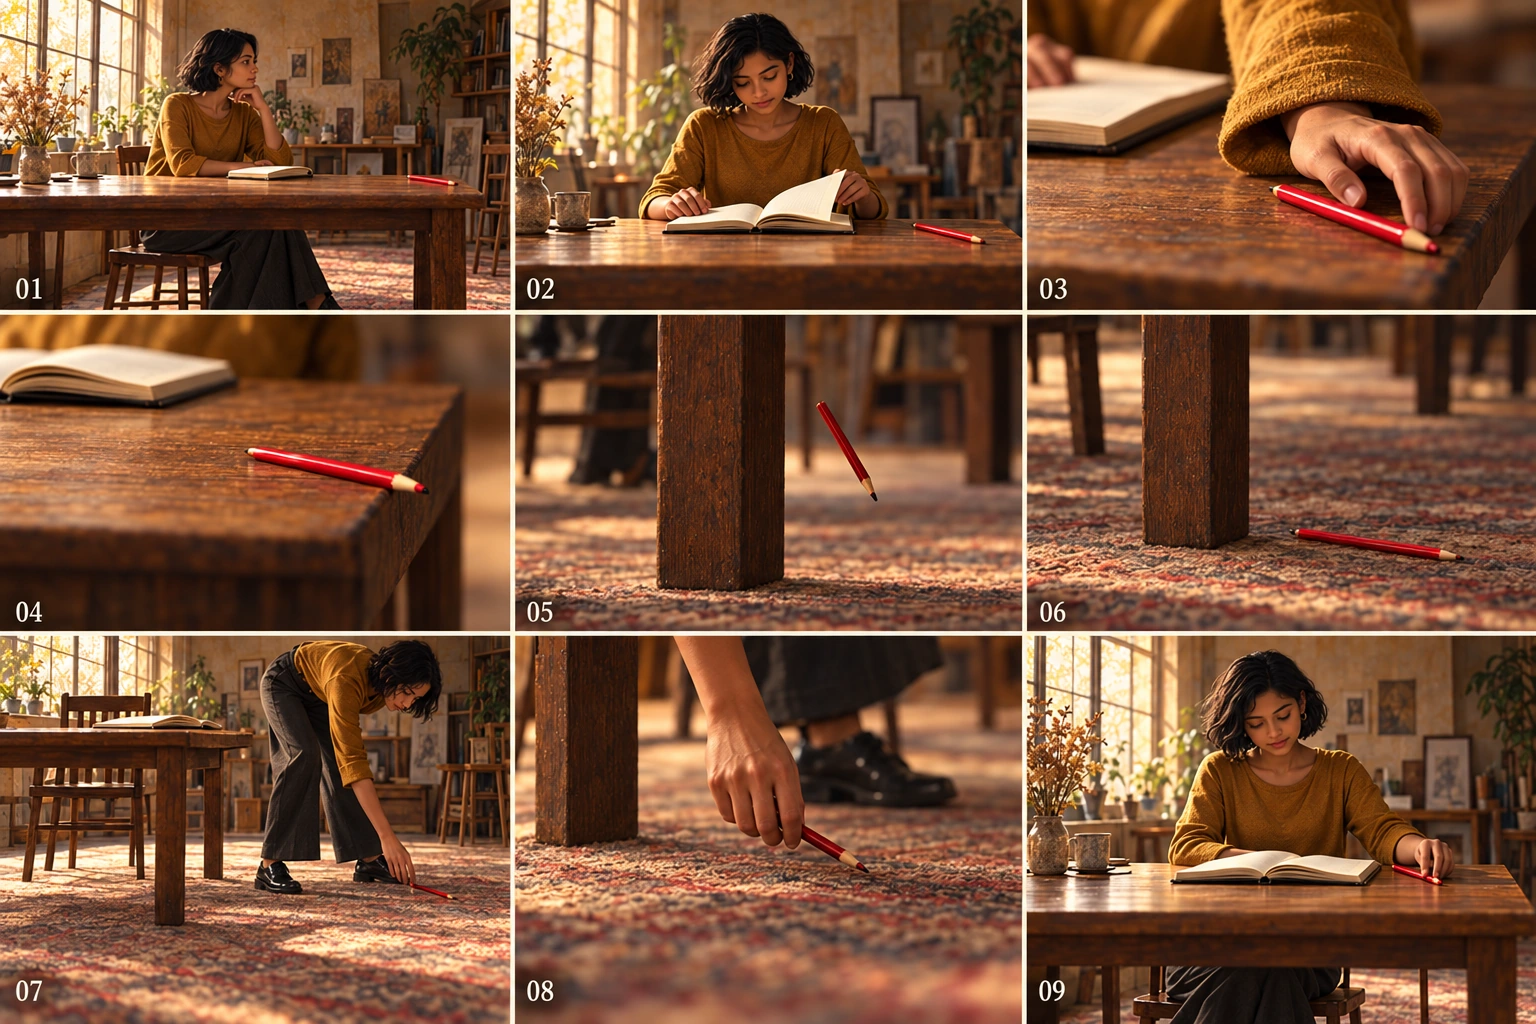
Codex-generated teaching candidate. These deviations were observed in the generated illustration; they are not EveryGen AI test results or evidence of a EveryGen AI failure rate.
Check the cause in Panel 03
The story calls for an accidental brush from Mira’s sleeve. The candidate instead shows fingers pushing the pencil.
That changes the action. A prompt correction should address the contact itself, not merely request a “more natural hand.”
Follow the fall and retrieval from Panels 05 to 08
In this candidate, the pencil falls and lands to the right of the visible table leg. Mira moves to the right end and bends toward it. Keep these useful relationships while correcting Panel 03.
Use the table leg as a stable landmark. Compare the pencil's location through the falling, landing, reaching, and pickup panels. A closer crop changes framing; it should not silently relocate the pencil or leave a duplicate behind.
Track object states across all nine panels
Follow the pencil independently of Mira:
Tabletop → sleeve contact → rolling → falling → floor → empty-hand reach → hand → tabletop.
Then track the notebook: closed in 01, open from 02 onward.
Look for duplicate pencils, a closed notebook returning without explanation, changed clothing, extra limbs, or furniture that shifts between views. Review the complete sequence even when only one panel has an obvious error.
5. Make focused corrections from a saved version
Keep the initial candidate. Switch to Image to Image and upload the version you want to revise. You can also repair the sequence from an existing sheet through the separate editing entry.
Choose a request that matches the observed problem. Do not ask for a complete restyling while fixing continuity.
For Panel 03, use:
Edit the uploaded nine-panel storyboard.

In Panel 03, show the cuff of Mira's ochre sleeve making contact with the red pencil as she adjusts the notebook pages.
Keep her fingers away from the pencil so they do not push or flick it.

Preserve the panel number, the open notebook, the character design, and the overall sheet layout.
Keep the other eight panels unchanged.
Do not add objects or text.
The request to keep other panels unchanged expresses intent; it does not lock those regions.
If your own candidate has additional position errors, use similarly bounded instructions:
| Target | Correction to request |
|---|---|
| 05: falling pencil | “Use Panel 06’s landing location as the reference. In Panel 05, place the single pencil in midair to the viewer’s right of the visible right-hand table leg. Keep the table orientation consistent.” |
| 07: retrieval position | “Show Mira out of her chair at the table’s right end, bending and extending an empty hand toward the pencil. Keep the pencil on the floor to the right of the right-hand leg. Do not move it beneath the table’s center.” |
Compare each revision with the saved baseline. Accept it only after checking whether it introduces changes elsewhere.
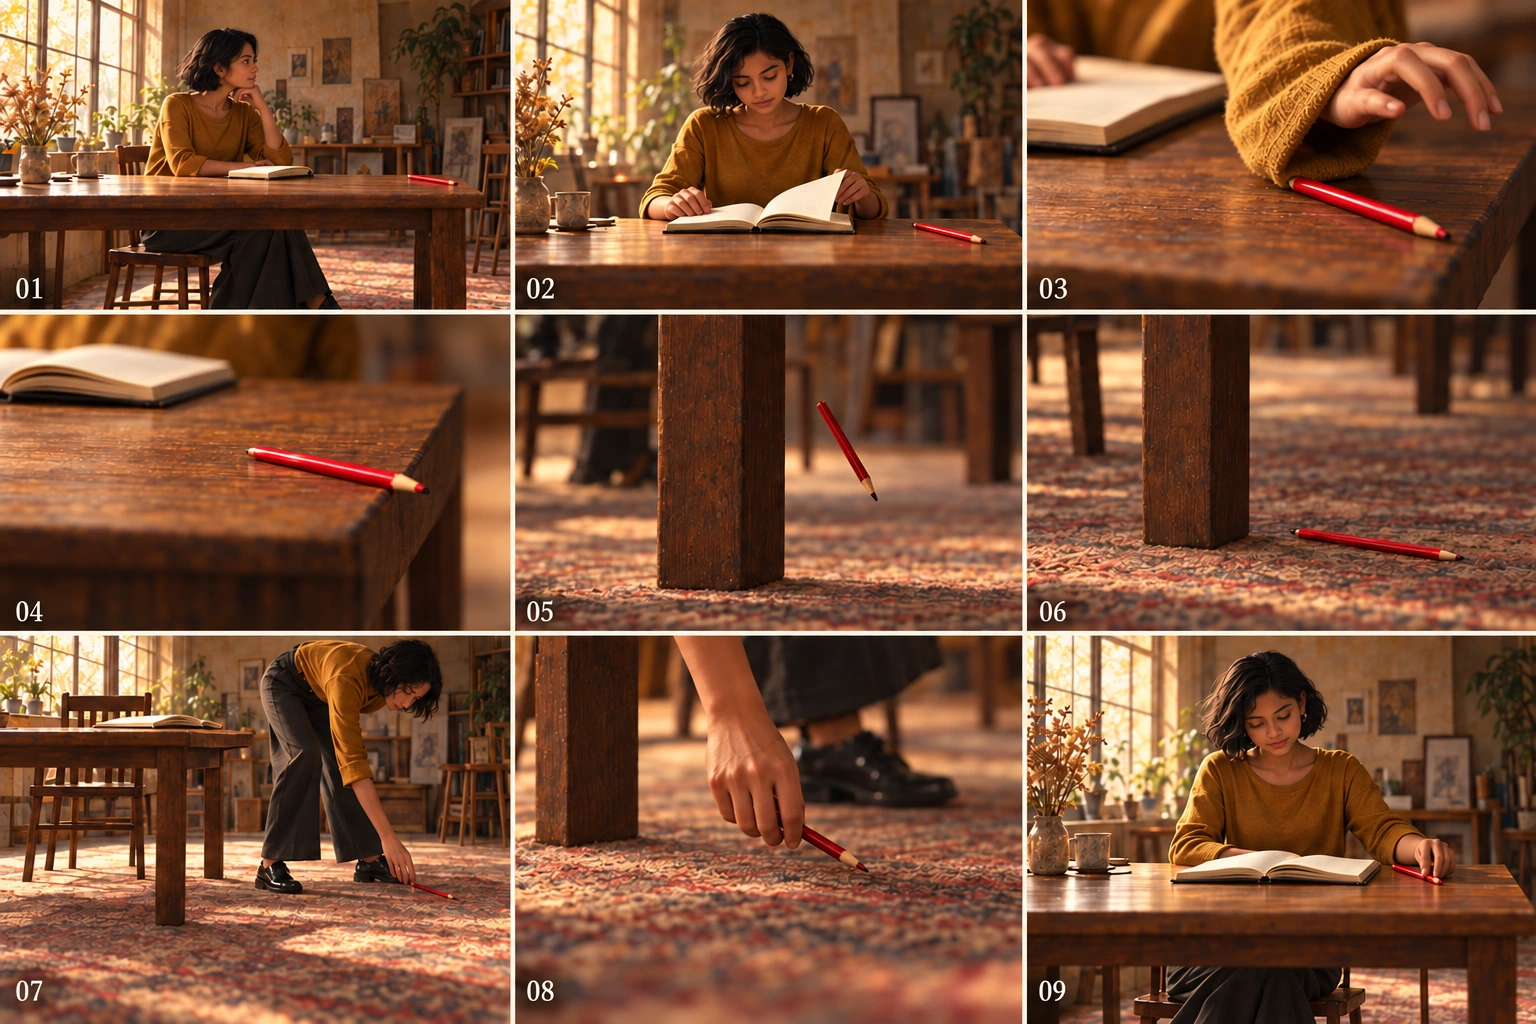
Codex-generated revised teaching sheet. It revises the contact while retaining the falling position and retrieval sequence; it is not an EveryGen AI edit or proof of perfectly preserved geometry and camera placement.
In the revised illustration, Panel 08 shows the hand holding the sole pencil with the ground clear. Panel 09 returns Mira to her seat, with the notebook open and one pencil on the table.
Those improvements still call for a whole-sheet review. Do not label a sequence finished solely because the targeted panel looks better.
6. Rebuild individual panels externally when necessary
When changing one panel repeatedly alters acceptable parts of the sheet, stop editing the entire image as though its cells were independent layers.
Work from a copy of the last acceptable version. In an external image editor, crop panels using their actual visible boundaries, not assumed equal pixel coordinates. Preserve the action and leave labels intact or add them separately as real text.
Save the crops in sequence, such as 01-start, 02-open-notebook, through 09-return-pencil. Make or draw a replacement panel separately using the character reference and its specific action brief, then assemble the nine images in an external layout document.
This is manual cropping and composition. It is not an automatic splitting feature of the EveryGen AI workflow.
Cropping also does not create new detail: each crop contains only the pixels available in that part of the original sheet. Inspect its actual dimensions before using it as a larger standalone image.
After assembly, check reading order, gutters, numbering, character appearance, and the pencil’s complete path again. A correct replacement placed in the wrong slot still produces an incorrect story.
7. Hand off a storyboard—not an implied video
Deliver the selected sheet with the nine-row action plan, the reference used, and any unresolved continuity notes. Keep the original candidate and accepted revisions clearly separated. Reopen the exact exported file before sharing it.
The static sheet communicates actions and proposed views. It contains no assigned durations, playback, or audio.
For a later stage, see how timed storyboards become animatics. That workflow arranges frames over time and can add audio to evaluate pacing. It is separate from generating this contact sheet. An animatic can be exported as a video file, but it is still a preview—not automatically a finished animated performance or filmed scene.
Nine panels do not mean nine seconds, nine cuts, or nine independently generated high-resolution frames.
The sequence is ready for review when someone can explain why the pencil fell, follow where it went, understand how Mira retrieved it, and confirm that it returns to the table without a duplicate appearing along the way.