 EveryGen AI
GPT-Image-2 in Practice: Restore Old Photos with a Single Prompt (Remove Scratches, Recover Detail, Colorize)
Clean up an old photo while preserving the original, checking identity and detail, and keeping restoration changes controlled.
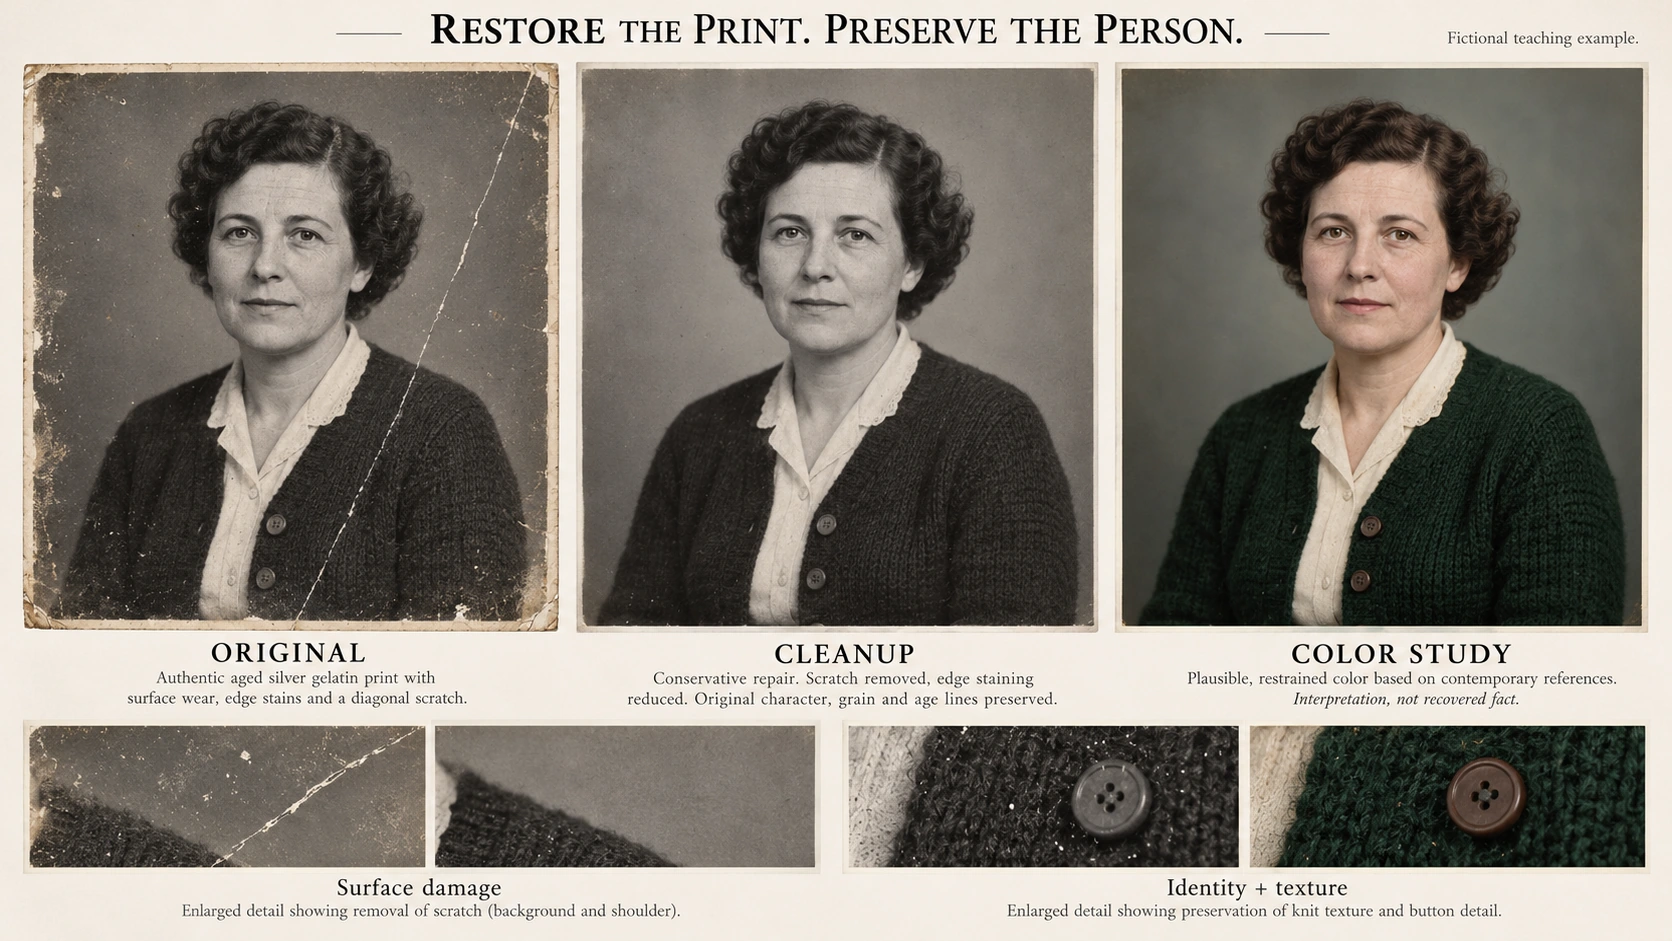
The goal of a conservative photo cleanup is a more readable viewing copy, not a newly invented portrait. Reducing a scratch is useful; changing the expression or adding convincing but unsupported facial detail is a different kind of edit.
This walkthrough focuses on one black-and-white photograph with light staining and a diagonal scratch. You will preserve the source, describe a limited repair, compare the result with the original, and stop when further editing would change more than it fixes.
The two illustrations are Codex-generated teaching materials based on a fictional portrait. They are not historical photographs or EveryGen AI test outputs.
1. Keep the original and improve the input first
Save the untouched scan or digital photograph before doing any editing. Make a separate working copy, and keep the physical print as well. Do not overwrite your only source with a cleaner-looking result.
Before uploading a working copy, check whether a better capture would solve part of the problem:
- Use the clearest, most complete scan available rather than a screenshot of a preview.
- When photographing a print, keep the camera facing it squarely and include its full edges.
- Check for glare, camera shadows, missed focus, and reflections before accepting the capture.
When reflection hides part of a face, try to capture the print again rather than asking a generator to guess what was underneath. Do not force a fragile print flat or alter the physical photograph for this exercise.
Keep any known names, dates, or other provenance in a separate record. Do not fill gaps in that record from details introduced by an edited image.
2. Identify the damage and the details that must remain
The example is a fictional black-and-white, half-length portrait of a middle-aged woman. She has short dark curls and a natural closed-mouth expression. A light blouse sits beneath a dark cardigan with exactly two visible round buttons.
There are stains near the edges and a diagonal scratch on the viewer’s right, crossing the gray background and outer shoulder. The eyes, nose, and mouth are intact.
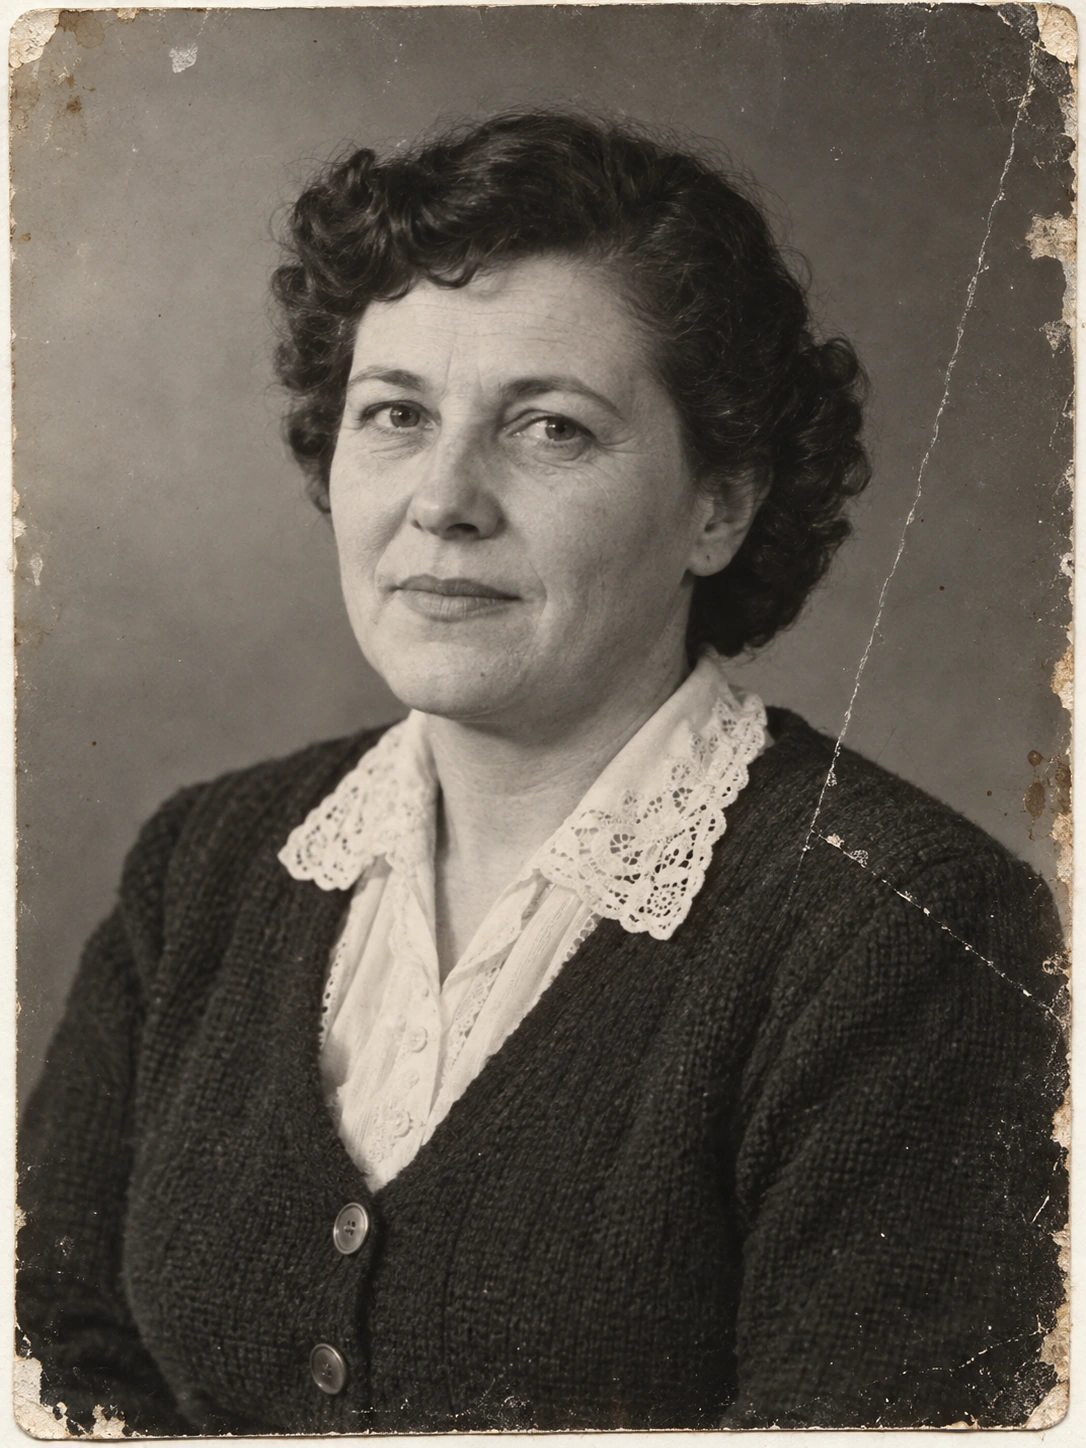
Codex-generated fictional aged-photo illustration. The intact facial features, collar, and two buttons provide details to compare during cleanup.
Write a short repair brief before choosing settings: reduce the main scratch and edge stains, make only a modest tonal adjustment, and retain the black-and-white appearance.
Keep the visible facial structure, expression, hair outline, collar, button count, clothing seams, and framing as comparison points. Do not automatically classify every line or uneven patch as damage. A seam, curl, or genuine shadow belongs to the photograph.
A cleaner face is not necessarily a more faithful face. MyHeritage explains why enhanced faces can contain inferred detail: its enhancement simulates what an unclear face may have looked like, and the result can be inaccurate or distorted. That is a limitation to take seriously when reviewing generated detail—not a description of EveryGen AI’s particular implementation.
For this task, do not ask the model to identify the person, determine a year, recover a true skin color, or make the portrait younger.
3. Upload one working copy and select 3:4
Open EveryGen AI to clean a working copy of an old photograph.
The checked interface defaults to Image to Image, GPT Image 2, Auto aspect ratio, 1K, JPEG, and x1. The reference-upload counter begins at 0/16. Add one working copy for this walkthrough; you do not need a collection of reference faces.
Open the settings and change the aspect ratio from Auto to 3:4 to match the example.
| Setting | Choice for this portrait |
|---|---|
| Mode | Image to Image |
| Model | GPT Image 2 |
| Reference | One working copy of the source photograph |
| Aspect ratio | 3:4, selected instead of Auto |
| Resolution preset | 1K |
| Output format | JPEG |
| Output count | x1 |
For your own photograph, choose a suitable available ratio and check the resulting framing. Do not stretch a differently proportioned original to imitate this example.
This workflow uses written editing instructions, not a brush or mask. Naming a location in the prompt tells the model what you intend to change; it does not create a protected boundary around everything else.
The teaching assets are 1086 × 1448 PNG files. Those dimensions and that format do not describe the EveryGen AI 1K JPEG export.
4. Use a conservative repair prompt
Copy the prompt below for the illustrated example. For another photograph, replace the damage locations and preservation details with what is actually visible in that source.
Edit the uploaded black-and-white portrait conservatively to create a viewing copy.

Requested cleanup:
Reduce the diagonal scratch on the viewer's right, where it crosses the gray background and the outer shoulder.
Reduce the small stains near the photograph's edges.
Make only a mild tonal adjustment if needed to improve the faded appearance.

Preserve the visible source content:
- The woman's face shape and the positions and shapes of her eyes, eyebrows, nose, and mouth.
- Her natural closed-mouth expression.
- The short dark curls and original hair outline.
- The light blouse, collar, and dark cardigan.
- Exactly two visible round buttons on the front of the cardigan.
- The existing clothing seams and overall garment shape.
- The pose, gray background, original framing, and 3:4 proportions.

Keep the image black and white.
Retain natural-looking grain and some aged-print texture, including around the edges.
Do not make the surface uniformly smooth or turn the portrait into a modern studio photograph.

Do not beautify, de-age, add makeup, reveal teeth, change the expression, or reconstruct the face.
Do not add new buttons, jewelry, props, text, dates, or decorative borders.
Do not colorize the photograph or invent a skin color.
Avoid aggressive sharpening and invented fine facial or fabric detail.

Where a detail is unclear in the source, leave that uncertainty rather than replacing it with a confident new feature.
Do not crop out damage as a substitute for repairing it.
These are requirements to evaluate, not guarantees of exact preservation.
Paste the prompt, confirm the reference and settings, and submit when ready. Save the candidate and the instructions used. Do not treat this setup as a tested promise about speed, success, or how much detail will remain unchanged.
5. Compare content first, damage second, sharpness last
The target illustration below shows the intended direction: the main diagonal scratch is removed, staining is reduced, and some old-photo texture remains.
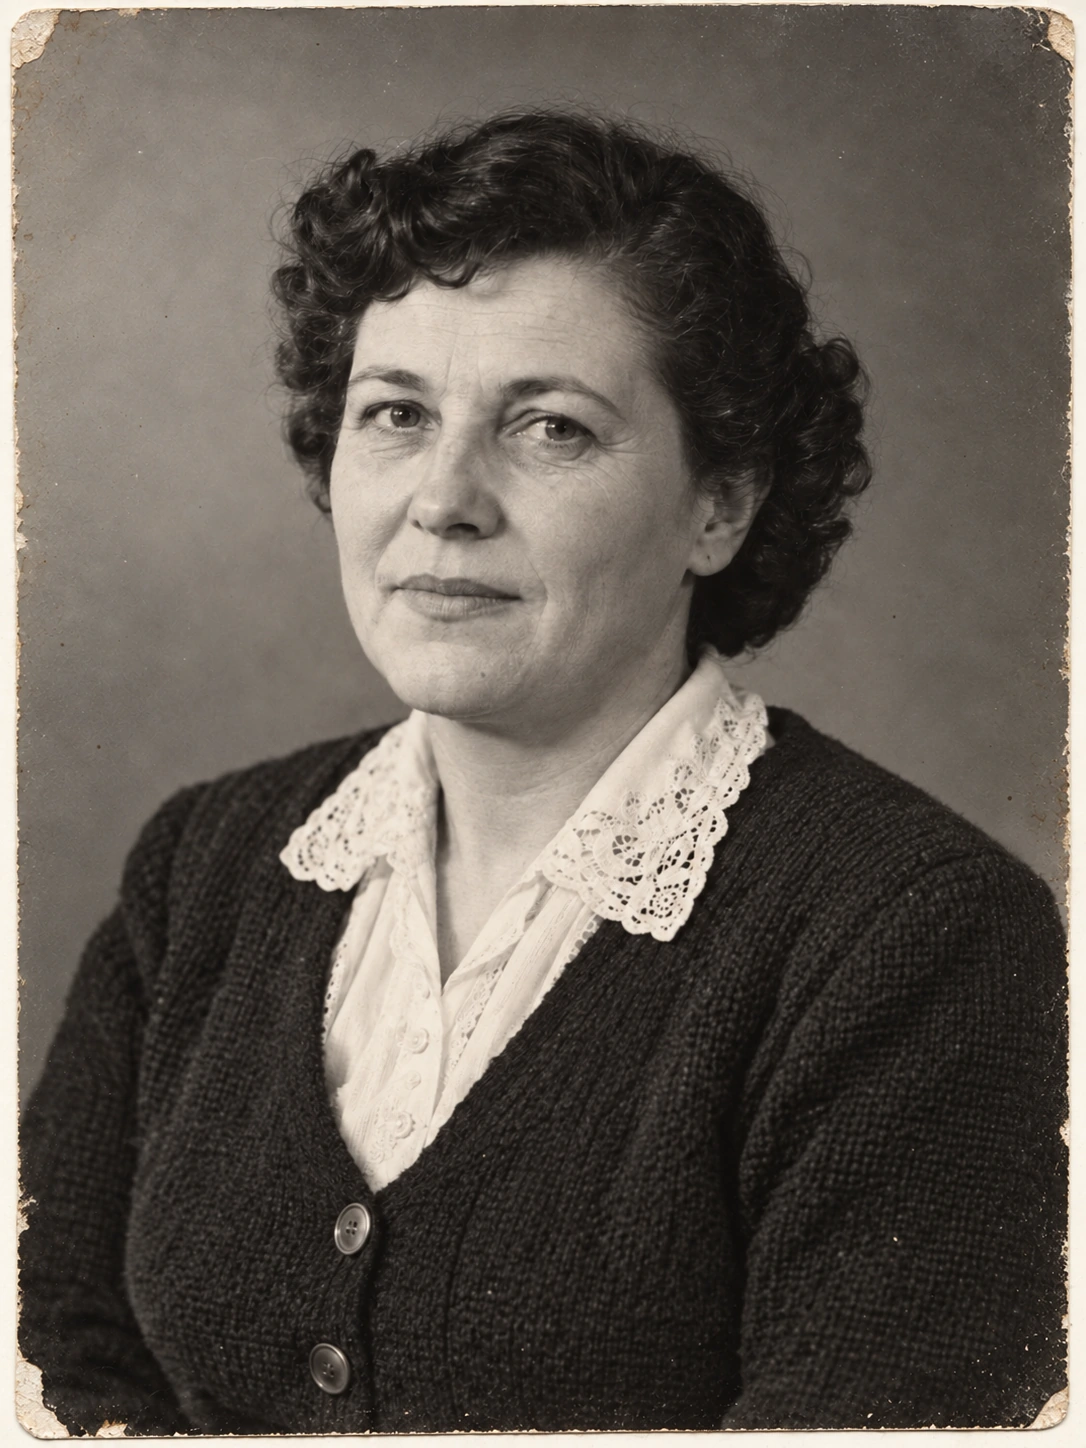
Codex-generated target edited from the same fictional source. It illustrates conservative cleanup, not pixel-perfect preservation: facial detail and fabric texture may have been redrawn.
Open your actual source and downloaded candidate side by side. Use the same displayed proportions, then inspect corresponding details at 100% zoom. If the files have different pixel dimensions, do not confuse a larger rendering with evidence of recovered detail.
First: visible facial structure, collar, and buttons
Compare the eyelids, mouth corners, nose outline, hairline, and closed-mouth expression. Look for a changed smile, newly visible teeth, reshaped eyes, or a different jawline.
Then check the blouse collar and cardigan. Count the two round buttons and compare their positions. Follow the garment seams and shoulder outline.
This is a check against visible source information, not an identity assessment. When a feature is unclear in the original, a sharper candidate does not establish what that feature truly looked like.
Second: the requested damage
Trace the diagonal scratch through the background and outer shoulder. Has it been reduced without changing the shoulder shape or replacing a broad area of the garment?
Inspect the stained edges. Check that the edit has reduced unwanted marks without creating an artificial border, removing part of the portrait, or cropping away the problem.
Do not make a completely spotless surface the only acceptable result. Leaving minor age texture can be preferable to changing intact content.
Third: tone, grain, and apparent sharpness
Review the whole portrait at its intended viewing size. Look for waxy skin, harsh edge outlines, smudged curls, or newly patterned fabric.
Check that the blouse still has tonal detail and that the dark cardigan has not become a featureless black shape. A stronger contrast adjustment is not necessarily a better cleanup.
Only consider additional sharpening after the content and damage checks pass. Do not accept an altered expression in exchange for a crisper image.
6. Narrow the next edit—or stop using generation
Keep the initial candidate separately. If it has changed the face or clothing, return to the source for another edit rather than trying to reconstruct the original from the altered version.
For a narrower attempt focused on the main scratch, upload the original working copy and use:
Edit this original black-and-white portrait with a narrower cleanup.

Reduce only the diagonal scratch on the viewer's right, across the gray background and outer shoulder.

Do not perform overall face enhancement, sharpening, skin smoothing, colorization, or broad tonal adjustment.

Retain the closed-mouth expression, visible facial structure, short curls, blouse collar, two round cardigan buttons, grain, and original framing.
Leave the other age marks for a separate decision.
Again, “only” describes the intended scope. Recheck the entire result.
| What went wrong | Better next step |
|---|---|
| The expression, eyes, or face shape changed. | Reject that candidate. Return to the original and narrow the request, or use external retouching away from the face. |
| A button, seam, or curl disappeared. | Compare with the source and recover the original detail in an external editor rather than inventing a replacement. |
| A small part of the scratch remains, but the rest is acceptable. | Repair that small area externally instead of requesting another broad regeneration. |
| Grain and fabric texture became unnaturally smooth or elaborate. | Return to the source or last acceptable version. Remove broad enhancement from the task. |
| The image was colorized or heavily modernized. | Reject it for this black-and-white cleanup. Do not describe the invented colors as recovered historical information. |
Use external local retouching for a small remaining defect
You can follow a separate local-retouching workflow when the remaining work needs more deliberate control. Adobe’s tutorial keeps the original layer untouched and uses separate editing layers, with Spot Healing or Clone Stamp for residual damage.
Those are external Photoshop tools, not EveryGen AI buttons. Work in small areas, compare with the source, and keep the edited document separate from the original scan. A manual repair can also introduce mistakes, so it still needs inspection.
Set a stopping point
Stop when further attempts keep changing intact features, when the source does not support the detail being added, or when a minor remaining mark is less harmful than the new artifacts.
Do not use this workflow to reconstruct an obscured face or turn unreadable writing into a supposedly factual name or date. Leave those uncertainties explicit. A generative viewing copy should not replace the unedited source when the photograph is needed as evidence or a historical record.
7. Export an AI-edited viewing copy
Download the selected JPEG and reopen the actual file. Check its dimensions, framing, two buttons, facial structure, and repaired areas once more. After any additional crop, resize, or external repair, inspect that final export again.
Keep the untouched source, the selected viewing copy, and a short edit record. Record the source filename, the work requested, any manual repairs, and uncertainties noticed during review. The date of editing is not the photograph’s capture date.
Use a filename such as:
portrait-ai-edited-viewing-copy.jpg
For a real photograph, a sharing caption can read:
AI-edited viewing copy. Scratch and stain reduction applied; the original scan is retained. Fine facial and fabric detail may include generated reconstruction.
Adjust the caption to the work actually performed. When sharing the illustrations from this tutorial, retain their identification as fictional, Codex-generated teaching images.
The useful result is a cleaner copy whose changes and limits remain understandable—not a claim that missing history has been recovered.
Optional color study: keep interpretation separate from restoration
After accepting a conservative black-and-white cleanup, make a separate color study if useful. Upload the accepted copy and ask for restrained plausible colors while preserving the face, pose, garments, buttons, lighting, and framing. Specify any colors supported by reliable references; otherwise label them as interpretation.
Create a separate restrained color interpretation of this repaired portrait.
Keep the face, natural age lines, pose, lace collar, two cardigan buttons,
hair, framing, and lighting unchanged. Use a cream blouse and muted green
cardigan as an artistic choice. Retain photographic grain.
Do not beautify, de-age, or claim these are the original historical colors.
The cover shows the difference between a damaged print, a black-and-white cleanup, and a color interpretation. Apparent fine detail can also be inferred by the model. Keep the untouched source and monochrome repair alongside any color version.